Welcome to the world of DIY projects and creative craftsmanship! Whether you are a dedicated hobbyist or a curious beginner, setting up a functional garage workshop is the first step towards turning your visions into reality. In this blog post, we will explore the essential tools that every DIY enthusiast needs to have in their arsenal, as well as the basic woodworking techniques that will help you bring your ideas to life. Additionally, we will delve into building practical storage solutions, exploring metalworking projects for beginners, and DIY electrical projects to improve your skills. Get ready to embark on a journey of creativity, learning, and transforming your space with custom furniture pieces and the art of refurbishing and upcycling old items for a new purpose. Let’s get started!
Setting up a functional garage workshop
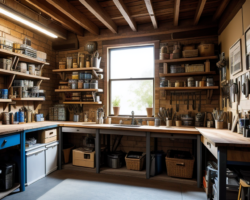
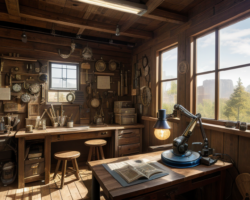
Setting up a functional garage workshop is essential for any DIY enthusiast or hobbyist. A well-equipped workshop not only allows you to complete projects efficiently but also provides a space to unleash your creativity and indulge in your favorite hobbies. Whether you are a beginner or an experienced DIYer, having a dedicated workspace in your garage can make all the difference in the quality of your work. In this blog post, we will explore the key factors to consider and the necessary steps to set up a functional garage workshop.
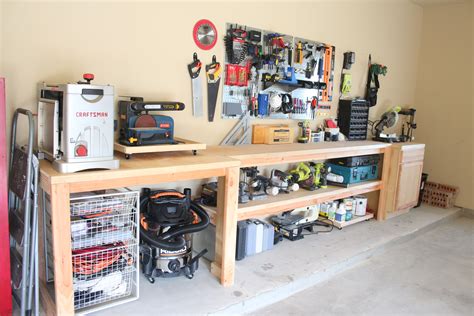
First and foremost, organizing and decluttering your garage is crucial in creating a suitable workspace. Remove any unnecessary items, sort and categorize tools and materials, and make sure everything has its designated place. Invest in storage solutions such as wall-mounted cabinets, pegboards, and shelving units to maximize the use of vertical space. This will not only create a tidy and efficient workspace but also make it easier for you to find and access your tools when needed.
Selecting the right tools is another important aspect of setting up a functional garage workshop. Consider the type of projects you plan to undertake and acquire the necessary tools accordingly. Start with the basics such as a workbench, power tools (e.g., drill, jigsaw, circular saw), hand tools (e.g., hammer, screwdrivers, wrenches), measuring tools (e.g., tape measure, level), and safety equipment (e.g., goggles, gloves, ear protection). As you progress and gain expertise, you can expand your collection of tools to suit more specialized projects.
Creating an ergonomic and efficient layout is essential for a functional workspace. Arrange your workbench in a way that provides sufficient space for your projects and allows easy movement around your garage. Consider the flow of work and position tools and equipment within arm’s reach. Additionally, ensure proper lighting by installing bright overhead lights or task lighting near your workbench. Good lighting not only enhances visibility but also reduces the risk of accidents.
- Invest in quality storage solutions to keep your tools and materials organized
- Choose the appropriate tools based on your projects’ requirements
- Create an ergonomic and efficient layout for your workspace
- Ensure proper lighting in your garage workshop
| Benefits of a functional garage workshop: |
|---|
| 1. Increases productivity |
| 2. Provides a dedicated space for creative projects |
| 3. Saves time and effort in locating tools and materials |
| 4. Enhances overall project quality and outcomes |
| 5. Promotes safety and reduces the risk of accidents |
In conclusion, setting up a functional garage workshop is a worthwhile investment for any DIY enthusiast. By organizing and decluttering your space, selecting the right tools, creating an ergonomic layout, and ensuring proper lighting, you can transform your garage into a productive and enjoyable workspace. With a well-equipped workshop, you will be able to tackle various projects with confidence and make your creative ideas come to life.
Essential tools for DIY projects
When it comes to tackling DIY projects, having the right tools can make all the difference. Whether you’re a seasoned DIY enthusiast or just starting out, having a set of essential tools at your disposal can save you time, effort, and frustration. In this blog post, we’ll explore the must-have tools for DIY projects that will help you complete tasks efficiently and effectively.
One of the most essential tools for DIY projects is a screwdriver set. A good screwdriver set will include a variety of sizes and types of screwdrivers, including flathead and Phillips head. These tools are necessary for tightening or loosening screws in furniture, appliances, and other household items. They are also handy for assembling furniture or installing fixtures.
Another indispensable tool for DIY projects is a power drill. Whether you’re hanging curtains, assembling shelves, or installing a light fixture, a power drill will save you time and effort. Look for a drill that is lightweight, portable, and has adjustable speed settings. An assortment of drill bits is also essential for drilling holes of different sizes and materials.
Measuring tape is another tool that should be in every DIY enthusiast’s toolbox. Accurate measurements are crucial for a successful DIY project, whether you’re cutting wood, fabric, or piping. Look for a measuring tape that is at least 25 feet long, has clear markings, and a lock feature to keep your measurements in place.
- Claw hammer: A claw hammer is a versatile tool that can be used for driving nails, removing them, and even light demolition work.
- Pliers: Pliers come in handy for gripping, bending, and cutting various materials including wires and nails.
- Utility knife: A utility knife is essential for cutting through materials such as cardboard, rope, and packaging.
- Adjustable wrench: An adjustable wrench allows you to tighten or loosen nuts and bolts of different sizes.
| Tool | Function |
|---|---|
| Screwdriver set | Tightening or loosening screws |
| Power drill | Drilling holes and driving screws |
| Measuring tape | Taking accurate measurements |
| Claw hammer | Driving and removing nails |
These are just a few of the essential tools for DIY projects. Depending on the specific projects you plan to tackle, you may also need additional tools such as a level, a stud finder, a circular saw, or a paintbrush set. Remember, investing in high-quality tools will pay off in the long run as they will last longer and perform better. With the right tools in your arsenal, you’ll be well-equipped to take on any DIY project that comes your way.
Mastering basic woodworking techniques
Woodworking is a timeless craft that allows individuals to create functional and beautiful pieces using wood. Whether you are a beginner or have some experience in woodworking, mastering the basic techniques is essential to hone your skills and create professional-looking projects. In this blog post, we will explore some of the fundamental woodworking techniques that every woodworker should aim to master.
1. Measuring and Marking: Accurate measurement is crucial in woodworking to ensure a precise and well-fitted outcome. Using a tape measure, carpenter’s square, and marking tools such as a pencil or marking knife, you can measure and mark the dimensions and angles on your workpiece. Remember to double-check your measurements to avoid any mistakes.
2. Cutting and Shaping: Cutting and shaping wood is a fundamental woodworking skill. There are various tools you can use, such as hand saws, jigsaws, circular saws, or table saws, depending on the project and the type of cut you need to make. Practice different cutting techniques to achieve clean, smooth, and precise cuts.
3. Joinery: Joinery is the art of connecting two or more pieces of wood together. There are numerous woodworking joints you can learn, such as the butt joint, lap joint, dovetail joint, and mortise and tenon joint. Each joint has its own purpose and strength. Mastering different joinery techniques will allow you to create sturdy and long-lasting connections between wood pieces.
4. Sanding and Finishing: Sanding is essential to create a smooth and polished surface for your woodworking projects. Start with coarse-grit sandpaper and gradually move to finer grits for a finer finish. After sanding, apply a suitable finish such as stain, paint, or varnish to protect the wood and enhance its appearance. Remember to follow proper safety precautions when handling sandpaper and finishes.
5. Safety and Tool Maintenance: Safety should always be a top priority in woodworking. Make sure to wear appropriate safety gear such as safety glasses, gloves, and a dust mask. Additionally, keeping your tools well-maintained and sharp is crucial for efficient and safe woodworking. Regularly clean and lubricate your tools, and sharpen blades when necessary.
Conclusion: Mastering basic woodworking techniques is the foundation for becoming a skilled woodworker. By learning and practicing these fundamental skills, you can expand your woodworking capabilities and create impressive projects. So, grab your tools, set up your workspace, and start honing your woodworking skills today!
Building practical storage solutions
When it comes to organization and tidiness, having practical storage solutions can make a world of difference in your home. Not only do they help you keep your belongings in order, but they also maximize space and create a more visually appealing environment. Whether you live in a small apartment or a large house, finding the right storage solutions is essential. In this blog post, we will explore different ideas and tips for building practical storage solutions.
One of the key elements in building practical storage solutions is making the most of vertical space. Shelves are a great way to achieve this. You can install wall-mounted shelves in any room to store books, decorative items, or even kitchen supplies. Another option is to use floating shelves, which are attached directly to the wall without any visible support brackets. These shelves not only provide storage but also add a stylish touch to your space.
Another practical storage solution that can help organize your home is storage bins and baskets. These can be used in every room to store toys, clothes, towels, and other items. Opt for stackable bins or ones with handles for easy access and mobility. Additionally, cubes and cubby storage units are ideal for keeping items neatly organized. You can use them in entryways, living rooms, or even in children’s bedrooms.
Pegboards are another versatile storage solution that can be customized to suit your needs. They are often used in workshops or garages to organize tools, but they can also be used in kitchens, offices, or craft rooms. Attach hooks, shelves, or even small baskets to the pegboard to hang and store various items. This allows you to keep everything within reach and frees up valuable counter or desk space.
In conclusion, building practical storage solutions is all about maximizing space and creating a clutter-free environment. By incorporating shelves, storage bins, cubbies, and pegboards into your home, you can effectively organize your belongings and make the most of your available space. Remember to assess your needs and consider the specific requirements of each room. With a little creativity and planning, you can transform your home into an organized and functional haven.
Exploring metalworking projects for beginners
Exploring metalworking projects for beginners:
Are you interested in metalworking but don’t know where to start? Don’t worry, you’re not alone. Metalworking can be an intimidating craft to get into, but with the right guidance and a few essential tools, you’ll be well on your way to creating beautiful and functional pieces. In this blog post, we’ll explore some beginner-friendly metalworking projects that will help you gain confidence and develop your skills. So, let’s dive in!
If you’re new to metalworking, it’s important to start with simple projects that allow you to practice basic techniques. One such project is making a copper bracelet. Copper is a soft metal that is easy to work with, making it ideal for beginners. To create a bracelet, you’ll need a few tools like a jeweler’s saw, metal files, and a metal ruler. Start by drawing a design on a piece of copper sheet and then carefully cut it out using the jeweler’s saw. Once you have the desired shape, use the metal files to smooth the edges and add any decorative details. Finally, bend the copper strip into a bracelet shape and polish it for a finished look.
Another fun project for beginners is metal etching. Metal etching involves creating designs or patterns on a metal surface by using an acid or a etching solution. This technique allows you to create intricate and detailed designs with minimal tools. To get started, you’ll need a piece of metal (such as copper or brass), stencils or an etching resist, an etching solution, and a paintbrush. Begin by cleaning the metal surface thoroughly and then apply the resist or stencil to the areas you want to protect. Next, carefully apply the etching solution using a paintbrush, making sure to cover the exposed areas. After a few minutes, rinse off the solution and remove the resist/stencil to reveal your design. Polish the metal for a shiny finish, and your etched creation is complete!
One more beginner-friendly metalworking project is sculpting with wire. This is a versatile and accessible form of metalworking that allows you to create three-dimensional shapes and sculptures. To start, you’ll need some pliers, wire cutters, and various gauges of wire. Begin by deciding on a design or shape you want to create, and then use the pliers to bend and shape the wire accordingly. You can experiment with different gauges of wire to achieve different effects and textures. Whether you want to make a simple wire sculpture or a more complex design, wire sculpting is a great way to explore your creativity and develop your metalworking skills.
- From creating a copper bracelet to trying out metal etching techniques, there are plenty of metalworking projects for beginners to explore. Start with simple projects that allow you to practice basic techniques and build your confidence.
- Remember to invest in the necessary tools for metalworking, such as jeweler’s saw, metal files, pliers, and wire cutters. These tools will help you achieve precise cuts and shapes.
- Always prioritize safety when working with metal. Wear protective gear like gloves and goggles to prevent any accidents or injuries. Additionally, make sure to work in a well-ventilated area or wear a mask when using chemicals for etching.
- Don’t be afraid to experiment and try new techniques. Metalworking offers endless possibilities for creativity and innovation. Let your imagination run wild and see where your metalworking journey takes you!
| Project | Difficulty Level | Estimated Time |
|---|---|---|
| Copper Bracelet | Easy | 1-2 hours |
| Metal Etching | Intermediate | 2-3 hours |
| Wire Sculpting | Easy | 2-4 hours |
So, if you’ve been wanting to try your hand at metalworking, now is the perfect time to get started. Start with these beginner-friendly projects and gradually challenge yourself with more complex designs. Remember to take it slow and enjoy the process. Happy metalworking!
DIY electrical projects to improve your skills
Are you bored of the same old DIY projects and looking to take your skills to the next level? Why not try your hand at some DIY electrical projects? Not only will they give you a sense of accomplishment, but they will also help you improve your electrical skills. Whether you’re a beginner or have some experience in electrical work, these projects will challenge you and provide you with the opportunity to learn and grow.
One of the simplest DIY electrical projects you can start with is replacing a light switch. It may seem intimidating at first, but with a few basic tools and some guidance, you can easily accomplish this task. Start by turning off the power to the switch, then remove the old switch plate and disconnect the wires. Next, connect the new switch to the wires, ensuring they are properly secured. Finally, attach the new switch plate and turn the power back on to test your work. This project will give you a better understanding of basic electrical wiring and provide you with confidence to tackle more complex projects.
If you’re looking for a more challenging project, consider installing a ceiling fan. This project requires a bit more knowledge and skill, but with the right instructions, you can do it successfully. Start by identifying the location where you want to install the fan and ensure there is proper support in the ceiling. Then, follow the manufacturer’s instructions to assemble the fan and secure it to the ceiling. Finally, connect the electrical wires and test the fan to make sure it’s working properly. This project will not only enhance the aesthetic appeal of your room but also improve your understanding of electrical circuits and connections.
| Benefits of DIY Electrical Projects: |
|---|
| 1. Gain valuable electrical knowledge and skills |
| 2. Save money on hiring a professional electrician |
| 3. Customize and enhance your home’s electrical features |
| 4. Feel a sense of accomplishment and satisfaction |
| 5. Improve your problem-solving abilities |
As you gain confidence in your electrical skills, you can advance to more complex projects such as installing a new electrical outlet or wiring a light fixture. These projects require a higher level of knowledge and attention to detail, but by following reliable guides and tutorials, you can successfully complete them. Remember to always prioritize safety, turn off the power when working with electricity, and consult a professional if you’re unsure about any aspect of the project.
In conclusion, engaging in DIY electrical projects is a fantastic way to improve your skills and gain valuable knowledge in the field. Whether you start with simple tasks like replacing a light switch or challenge yourself with more complex projects like wiring a new outlet, each project will contribute to your growth as a DIYer. So, don’t be afraid to step outside of your comfort zone and embark on a new electrical adventure. Happy DIYing!
Creating custom furniture pieces for your home
When it comes to creating custom furniture pieces for your home, the possibilities are endless. Whether you’re looking to add a unique touch to your living room or personalize your bedroom with one-of-a-kind pieces, building your own custom furniture can be a rewarding and fulfilling experience.
One of the first steps in creating custom furniture is deciding on a design that reflects your personal style and meets your needs. Take some time to browse through design magazines, websites, and even visit furniture stores to gather inspiration. Consider the overall style of your home and think about what type of furniture would complement your existing decor.
Once you have a design in mind, it’s time to gather the necessary tools and materials. This is where having a well-equipped workshop can make a big difference. Some essential tools for custom furniture making include a table saw, a miter saw, a drill, and a sander. These tools will help you cut and shape the wood, drill holes for screws and dowels, and sand the surfaces for a smooth finish.
- Table saw
- Miter saw
- Drill
- Sander
As you start building your custom furniture piece, it’s important to pay attention to the details. Taking accurate measurements and ensuring precise cuts will result in a well-fitting and aesthetically pleasing final product. Additionally, don’t forget to sand and finish the wood to give it a polished look. You can choose to add a stain, paint, or a clear finish depending on the desired outcome.
| Tool | Function |
|---|---|
| Table saw | Cutting large pieces of wood |
| Miter saw | Creating angled cuts for joints |
| Drill | Creating holes for screws and dowels |
| Sander | Smoothing surfaces for a polished finish |
In addition to the technical aspects of building custom furniture, it’s important to have patience and perseverance. Custom furniture making can be a time-consuming process, but the end result will be worth it. Take your time, follow the instructions carefully, and don’t be afraid to ask for help or seek guidance from experienced woodworkers.
Building custom furniture allows you to not only create pieces that perfectly fit your space but also express your creativity and showcase your woodworking skills. Whether it’s a unique dining table, a custom headboard for your bed, or a personalized bookshelf, the possibilities are truly endless. So go ahead, start designing and building your own custom furniture to elevate the style and functionality of your home.
Refurbishing and upcycling old items for a new purpose
Refurbishing and upcycling old items can be a rewarding and creative way to give new life to objects that would otherwise be discarded. Not only does it help reduce waste and contribute to a more sustainable lifestyle, but it also allows us to add a personal touch to our living space by creating unique and customized pieces. In this blog post, we will explore the art of refurbishing and upcycling and provide some tips and ideas to inspire your own projects.
One of the essential aspects of refurbishing and upcycling is to find the right items to work with. Look around your home, visit antique stores, or browse online marketplaces to find old furniture, decorations, or even household items that are still in good condition but may need some love and attention. Keep an eye out for unique shapes, interesting textures, and solid structures that can be transformed into something beautiful and functional.
Once you have found your item, the refurbishing process can begin. Start by thoroughly cleaning and preparing the object for the makeover. This may involve removing any existing paint or varnish, sanding down rough surfaces, or repairing any damages. It’s important to have a clear idea of what you want the final result to look like, as this will guide your decisions throughout the process.
- Choose paint colors and finishes that complement your overall aesthetic. Consider using environmentally-friendly options such as low VOC or water-based paints.
- Experiment with different techniques such as distressing, stenciling, or decoupage to add character and texture to your piece.
- Don’t be afraid to mix and match materials. Incorporate reclaimed wood, vintage fabric, or salvaged metal to create a truly one-of-a-kind piece.
- Consider adding new hardware or decorative elements to enhance the functionality and visual appeal of your refurbished item.
| Benefits of Refurbishing and Upcycling | Tips for Successful Refurbishing | Ideas for Upcycling Projects |
|---|---|---|
|
|
|
Refurbishing and upcycling old items is not only a way to breathe new life into forgotten objects, but it also allows us to unleash our creativity and contribute to a more sustainable future. So, gather your tools, let your imagination run wild, and start transforming old items into something special and unique for your home.
Frequently Asked Questions
1. What are the essential tools needed for a functional garage workshop?
Some essential tools for a functional garage workshop include a workbench, power tools such as a drill and a saw, hand tools like screwdrivers and wrenches, measuring tools such as a tape measure and a level, and storage solutions for organizing tools and supplies.
2. How can I master basic woodworking techniques?
To master basic woodworking techniques, it is important to start with simple projects and practice using tools such as hand saws, chisels, and planes. It is also helpful to learn about different types of wood and joinery methods, and to follow step-by-step tutorials or take woodworking classes.
3. What are some practical storage solutions I can build for my garage workshop?
You can build practical storage solutions for your garage workshop such as wall-mounted shelves, tool racks or pegboards, rolling cabinets or workbenches with built-in storage drawers, and overhead storage racks for storing items that are not used frequently.
4. What metalworking projects are suitable for beginners?
Some metalworking projects suitable for beginners include making simple jewelry like rings or bracelets, creating decorative wall art using metal sheets or wire, and building basic metal shelves or simple furniture pieces.
5. What are some DIY electrical projects that can help improve my skills?
Some DIY electrical projects that can help improve your skills include installing light fixtures or ceiling fans, replacing electrical outlets or switches, troubleshooting and fixing common electrical issues, and wiring or rewiring a small room or area.
6. How can I create custom furniture pieces for my home?
To create custom furniture pieces for your home, you can start by designing your desired piece and creating a detailed plan or blueprint. Then, gather the necessary tools and materials, and follow step-by-step instructions or tutorials to build and assemble the furniture.
7. What are some tips for refurbishing and upcycling old items for a new purpose?
Some tips for refurbishing and upcycling old items for a new purpose include thoroughly cleaning and prepping the item, using appropriate techniques and materials for restoration such as sanding or painting, and getting creative with repurposing ideas to give new life to the item.