Introduction to Light Craft Workshops
Light craft workshops offer a fun and creative way to explore different craft techniques and create beautiful works of art. These workshops are designed for both beginners and experienced crafters who want to enhance their skills and learn new techniques. In this blog post, we will introduce you to the world of light craft workshops and why they are a great way to unleash your creativity.
One of the key aspects of light craft workshops is the use of basic tools and materials. These workshops provide a hands-on experience with a variety of tools including scissors, rulers, glue, and different types of paper. Participants are encouraged to experiment with these tools and materials to create unique artworks.
Light craft workshops also focus on mastering paper folding techniques. Paper folding, also known as origami, is an ancient art form that involves creating intricate designs by folding paper in different ways. Participants will learn various folds and techniques to create beautiful origami designs such as flowers, animals, and geometric shapes.
- Introduction to Light Craft Workshops
- Understanding Basic Tools and Materials
- Mastering Paper Folding Techniques
- Creating Intricate Origami Designs
- Exploring the Art of Lantern Making
- Learning the Technique of Paper Cutting
- Experimenting with Glass Painting
| Workshop Venue | Date | Time |
|---|---|---|
| ABC Art Studio | June 15, 2022 | 10:00 AM – 12:00 PM |
| XYZ Community Center | July 20, 2022 | 2:00 PM – 4:00 PM |
| 123 Craft Hub | August 10, 2022 | 6:00 PM – 8:00 PM |
If you are interested in light craft workshops, it’s a great chance to delve into the world of creativity and artistry. So why not join a workshop near you and explore your artistic side? Whether you are a beginner or have some experience, these workshops will surely inspire you to create stunning artworks with your own hands.
Understanding Basic Tools and Materials
When it comes to engaging in any craft work, understanding the basic tools and materials is essential. Whether you are a beginner or have some experience, having the right tools and materials can make all the difference in your projects. This blog post will guide you through the key tools and materials you need to get started in your crafting journey.
Tools
1. Scissors: A good pair of scissors is a must-have tool for any crafter. Look for scissors with a sharp blade and comfortable grip.
2. Craft Knife: A craft knife is handy for precision cutting and intricate designs. Make sure to use it with caution and keep it out of reach of children.
3. Cutting Mat: A self-healing cutting mat is a valuable tool to protect your work surface and ensure clean cuts.
Materials
1. Paper: Paper is a versatile material used in a wide range of craft projects. Stock up on different types of paper, such as colored, patterned, and textured.
2. Cardstock: Thicker and sturdier than regular paper, cardstock is ideal for making cards, scrapbooking, and other paper crafts.
3. Adhesives: Various adhesives, such as glue sticks, double-sided tape, and adhesive dots, are essential for sticking different materials together.
List of Content Rich Websites:
| Website | Description |
|---|---|
| Craftsy | A popular online platform offering a wide range of craft courses and tutorials. |
| DIY Network | A comprehensive website providing step-by-step crafting guides and project inspiration. |
| Martha Stewart Crafts | Martha Stewart’s official crafting website offering tips, ideas, and tutorials for various crafts. |
By familiarizing yourself with these basic tools and materials, you will be well-equipped to embark on your craft projects. Remember to start with simple projects and gradually build your skills as you gain more experience. Happy crafting!
Mastering Paper Folding Techniques
The art of paper folding, also known as origami, has been practiced for centuries and is beloved by many. It is a craft that involves folding a single sheet of paper into various shapes and forms, creating intricate designs that can be both captivating and beautiful. For those looking to explore this art form, mastering paper folding techniques is essential. In this blog post, we will delve into the world of origami and discuss some tips and tricks for gaining expertise in this craft.
One of the first things to understand when it comes to mastering paper folding techniques is the importance of selecting the right type of paper. Different types of paper have different qualities, such as thickness, texture, and flexibility. The ideal paper for origami should be thin, yet sturdy enough to hold its shape. Bond paper or kami, a type of traditional origami paper, is widely used by beginners as it is readily available and easy to work with.
Once you have chosen the right paper, it is time to familiarize yourself with the basic folds used in origami. There are several key folds that form the foundation of most origami models. These include the mountain fold, valley fold, reverse fold, and squash fold. Each of these folds creates a different type of crease in the paper and can be combined in various ways to create intricate designs. It is essential to practice these basic folds until they are second nature before attempting more complex models.
As with any craft, practice is key to mastering paper folding techniques. It is advisable to start with simple models and gradually work your way up to more complex designs. There are many resources available online, such as instructional videos and diagrams, that can help guide you through the process. Additionally, attending workshops or joining origami clubs can provide valuable hands-on experience and opportunities to learn from experienced origami artists.
- Start with simple models and gradually progress to more complex designs.
- Practice the basic folds until they become second nature.
- Explore different types of paper to find the one that suits your needs.
- Utilize online resources and consider attending workshops or joining origami clubs for further guidance.
| Benefits of Mastering Paper Folding Techniques |
|---|
| Enhances creativity and imagination |
| Improves focus and concentration |
| Provides a sense of achievement |
| Can be a form of relaxation and stress relief |
| Offers an avenue for self-expression |
Mastering paper folding techniques is not only about creating beautiful origami models but also about the journey of self-discovery and personal growth. It is a craft that requires patience, precision, and a willingness to learn. So, gather your paper and start folding! With dedication and practice, you will soon be impressing others with your mastery of this ancient art.
Creating Intricate Origami Designs
Origami is a centuries-old art form that originated in Japan. It involves folding paper into various shapes and designs, creating beautiful sculptures and objects. From simple shapes like animals and flowers to complex designs like dragons and buildings, the possibilities with origami are endless. In this blog post, we will explore the art of creating intricate origami designs and the techniques involved in mastering this craft.
When it comes to creating intricate origami designs, one of the most important aspects is having a good understanding of the basic folds. There are various types of folds used in origami, such as the valley fold, mountain fold, and squash fold. These folds form the foundation of any origami design and mastering them is essential for creating more intricate and complex designs.
Listed below are some of the tools and materials that are commonly used in origami:
| Tools | Materials |
|---|---|
| Scissors | Origami paper |
| Bone folder | Washi paper |
| Ruler | Foil-backed paper |
| Pencil | Patterned paper |
Experimenting with different types of paper can also add a unique touch to your origami designs. Origami paper is often square and comes in a variety of colors and patterns. Washi paper, on the other hand, is a traditional Japanese paper that is known for its strength and durability. Foil-backed paper can add a metallic sheen to your designs, while patterned paper can create interesting visual effects.
Creating intricate origami designs requires patience and practice. It is important to start with simpler designs and gradually work your way up to more complex ones. Following origami diagrams and instructions can be helpful in understanding the folding techniques and sequences. Online tutorials and books are also great resources for learning new designs and techniques.
Remember to take your time and enjoy the process of creating origami. The art of origami is not only about the final result but also about the journey of folding and creating. With practice and dedication, you can master the art of creating intricate origami designs and impress others with your craftsmanship.
Exploring the Art of Lantern Making
Have you ever been fascinated by the soft glow of lanterns on a serene night? Lanterns have always held a special place in our hearts, conjuring up images of festivals, celebrations, and secret wishes. If you have a penchant for creativity and a love for crafting, then exploring the art of lantern making might just be the perfect journey for you.
Creating lanterns not only allows you to tap into your artistic side but also gives you the opportunity to explore different cultures and their rich traditions. Whether you are a beginner or a seasoned crafter, learning the techniques of lantern making can open up a world of possibilities for you.
One of the key aspects of lantern making is understanding the significance of different materials and tools. From the sturdy frame to the delicate paper, each element plays a crucial role in bringing your lantern to life. By understanding the basic tools and materials required, you can embark on your lantern making adventure with confidence and ease.
- Frames: Lantern frames come in various shapes and sizes, such as round, square, or even multi-sided. They provide a foundation for your lantern and determine its overall shape. Choose a frame that suits your design and desired outcome.
- Paper: The type of paper you use can drastically affect the final look of your lantern. Thin, translucent papers like rice paper or tissue paper allow light to pass through beautifully, while thicker papers can provide sturdiness and durability.
- Cutting Tools: Depending on the complexity of your design, you may need a variety of cutting tools. Scissors, craft knives, and paper punches are commonly used to create intricate patterns and shapes.
As you explore the art of lantern making, don’t be afraid to experiment with different styles and techniques. From traditional lanterns with intricate paper cutouts to modern interpretations with bold designs, the possibilities are endless. Let your imagination run wild and watch as your creations light up your surroundings and ignite joy in the hearts of those who admire them.
| Benefits of Lantern Making | Tips for Beginners |
|---|---|
|
|
So, whether you want to add a touch of warmth and elegance to your home or immerse yourself in the world of lantern festivals, exploring the art of lantern making is a fulfilling and rewarding experience. With the right tools, materials, and a sprinkle of creativity, you can create exquisite lanterns that will shine bright and bring joy to any occasion.
Learning the Technique of Paper Cutting
Paper cutting is a fascinating art form that involves cutting out intricate designs from a single sheet of paper. It has a long history that can be traced back to ancient China, where it was used for ceremonial purposes. Today, paper cutting has evolved into a popular craft that allows artists to create beautiful and delicate pieces of art.
When it comes to paper cutting, the first thing you need to understand is the importance of basic tools and materials. The most essential tool is a sharp pair of scissors or a craft knife. You will also need a self-healing cutting mat to protect your work surface and ensure clean cuts. As for materials, you can start with simple colored paper, but as you advance, you may want to experiment with different textures and thicknesses.
Once you have your tools and materials ready, it’s time to master the technique of paper cutting. The key to successful paper cutting is developing a steady hand and mastering the art of precision. Start by practicing basic cutting techniques, such as straight lines and curves. As you become more confident, you can move on to more complex designs and incorporate elements like negative space and layering.
There are various styles and techniques of paper cutting, each with its own unique characteristics. For instance, the Chinese paper cutting style often features intricate floral patterns and symbolic motifs. On the other hand, the Japanese style focuses on minimalist designs and often incorporates elements of nature. Experimenting with different styles will not only broaden your skills but also allow you to develop your own signature style.
One way to enhance your paper cutting skills is by exploring the art of stencil cutting. Stencils provide a great way to create consistent and intricate designs. You can either create your own stencils or purchase pre-made ones. Stencil cutting requires precision and patience, but the end results are truly rewarding.
In conclusion, learning the technique of paper cutting is a rewarding journey that allows you to express your creativity and create stunning pieces of art. By understanding the basic tools and materials, mastering the cutting technique, and experimenting with different styles and stencils, you can take your paper cutting skills to new heights. So, grab your scissors and start cutting!
Experimenting with Glass Painting
Glass painting is an art form that allows you to create beautiful designs on glass surfaces. Whether it’s a glass vase, a window pane, or a decorative item, glass painting adds a stunning touch to any piece. If you are interested in trying your hand at this versatile and unique art form, you’re in luck! In this blog post, we will dive into the world of glass painting and explore different techniques, tools, and materials that you can use to create your own masterpiece.
Glass painting is a fascinating art form that involves painting on glass surfaces using specialized paints, brushes, and techniques. It is a creative way to add color, texture, and pattern to plain glass objects. With glass painting, you can transform ordinary glassware into stunning decorative pieces that can be used as centerpieces or gifts.
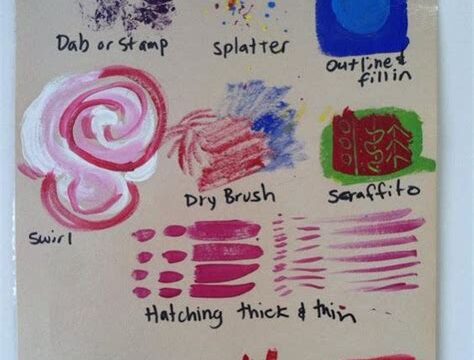
There are various techniques that you can experiment with in glass painting. One popular technique is the outline technique, which involves creating an outline of the desired design on the glass surface and then filling it in with colors. This technique allows for precise detailing and gives the design a stained glass effect. Another technique is reverse glass painting, where the painting is done on the reverse side of the glass surface, creating a unique translucent effect.
When it comes to tools and materials for glass painting, you will need a few essentials. The most important tool is a glass paintbrush, which has softer bristles compared to regular paintbrushes. These brushes allow for smooth and even strokes on the glass surface. Additionally, you will need glass paints that are specifically designed for glass painting. These paints are usually oil-based or water-based and come in a wide range of vibrant colors. Other materials that you may need include a palette for mixing colors, a palette knife for blending, and a glass cleaner for prepping the glass surface.
- Experiment with different techniques such as the outline technique and reverse glass painting
- Invest in quality glass paintbrushes and glass paints
- Prepare the glass surface properly before starting the painting
- Practice on smaller, inexpensive pieces before working on larger or more valuable items
- Explore different color combinations and patterns to create unique designs
- Consider using stencils or templates for more intricate designs
- Allow sufficient drying time between layers of paint
- Apply varnish or a sealant to protect the finished painting
- Display your glass painting in a well-lit area to enhance its beauty
| Pros | Cons |
|---|---|
| Allows for creativity and self-expression | Can be challenging, especially for beginners |
| Can be a therapeutic and relaxing activity | Requires patience and attention to detail |
| Creates unique and personalized decorative items | Mistakes can be difficult to fix or undo |
| Offers a wide range of techniques and effects | Requires proper ventilation when working with certain types of paints |
Experimenting with glass painting is a wonderful way to unleash your creativity and explore a unique art form. Whether you are a beginner or an experienced artist, this versatile medium offers endless possibilities. So, gather your tools, choose your colors, and let your imagination run wild as you embark on a glass painting journey.
Frequently Asked Questions
Q: What are the basic tools and materials needed for light craft workshops?
A: The basic tools and materials needed for light craft workshops include scissors, glue, paper, markers, and various decorative items like beads and ribbons.
Q: How can I master paper folding techniques?
A: To master paper folding techniques, it is important to start with simple origami designs and practice folding accurately and neatly. There are also many online tutorials and books available to guide you through different folding techniques.
Q: What are some intricate origami designs I can create?
A: Some intricate origami designs include the crane, dragon, flower bouquet, and modular origami structures. These designs require advanced folding techniques and patience.
Q: How can I explore the art of lantern making?
A: You can explore the art of lantern making by learning different folding and cutting techniques, using various types of paper, and experimenting with different lantern shapes and sizes. There are also workshops and classes available that can teach you specific lantern making techniques.
Q: What is paper cutting and how can I learn the technique?
A: Paper cutting is the art of creating intricate designs by cutting paper with scissors or a craft knife. You can learn the technique by practicing with simple patterns, using templates, and gradually progressing to more complex designs. There are also online tutorials and workshops available for learning different paper cutting techniques.
Q: How can I experiment with glass painting?
A: To experiment with glass painting, you can start by purchasing glass paints and brushes. Practice on small glass surfaces, such as jars or picture frames, and experiment with different painting techniques and designs. It is also helpful to study different glass painting styles and learn about the proper techniques for applying and curing the paint.
Q: Can you recommend any resources for learning light craft techniques?
A: Yes, there are many resources available for learning light craft techniques. Some popular websites include YouTube, where you can find video tutorials, and craft blogs that offer step-by-step instructions and inspiration. You can also consider joining local crafting communities or attending craft workshops in your area.